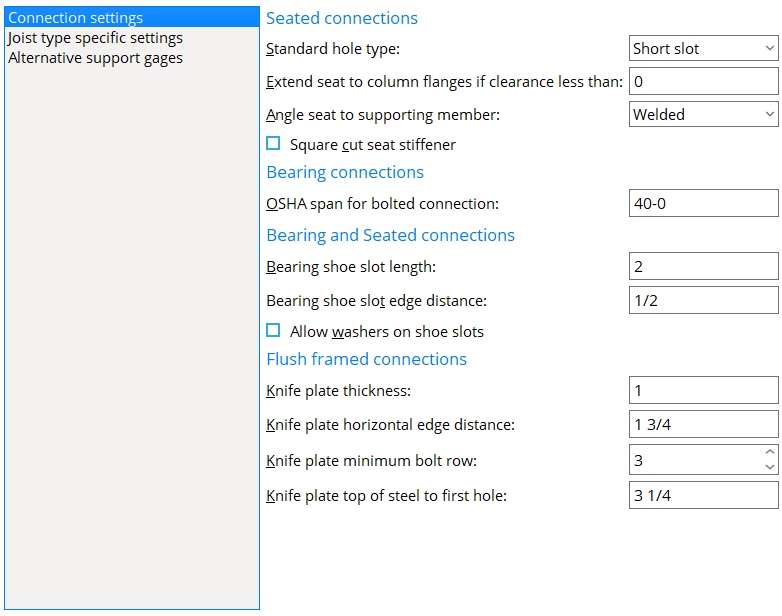
The Joist Connection Settings setup window ( Fabricator Settings )

  • Settings on this window affect the design of connections for joists.

Settings applied here, to the Joist Connection Settings window, are for your current Fabricator .

Also see :

VIDEO A joist with a bolted ' Plain end ' connection (' Bearing ' connection in v2018 and newer) is edited to show information that comes from the Joist Connection Settings window. Then the Joist Connection Settings window is opened and some of the options on it are explained. ( SDS2 Detailing , v2017)

home > project settings > fabricator > standard fabricator connections >


  To open Joist Connection Settings :

Method 1 : Home > Project Settings > Fabricator > Standard Fabricator Connections > Joist Connection Settings .

Password protection: If a password has been set using the Change Setup Password utility, you can open this window only if you first enter that exact password.

home > project settings > fabricator > standard fabricator connections > | top


------ Seated connections ------

Standard hole type : Standard round or Short slot or Long slot or Oversized round or User slot #1 or User slot #2 .
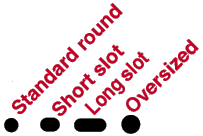
Effect on Modeling: Connection design of a joist seat determines the specific size and shape of holes in the seat from the hole type entered here and the diameter of the bolt that is used. The default bolt diameter is set on a per-joist-type basis, under " Default bolt criteria " in Bolt Settings ( Home > Project Settings > Job ).

Please note: The hole type in the joist shoe is a long slot whose length is the " Bearing shoe slot length ."

In SDS2 software versions prior to v2017, " Standard hole type " in Home > Project Settings > Fabricator > Standard Fabricator Connections > Beam Seat Settings applied to both beam seats and joist seats. Now that option only applies to beam seats.

Extend seat to column flange if clearance is less than: The distance (in the primary dimension " Units " or other units ) between the joist seat and the flange of the column at which connection design is instructed to extend that joist seat to the column flanges.
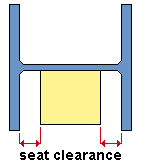
Effect on connection design: Normally connection design creates joist seats whose edges are the width of the joist shoe. The distance entered here instructs connection design to look at joist seats to column webs. If the joist shoe is closer to the supporting column's flange than the entered dimension, connection design automatically extends the seat to the column flanges and clips the inside corners using the column's " k distance " to determine the size of the cut.

In SDS2 software versions prior to v2017, " Extend seat to column flange if clearance is less than " in Home > Project Settings > Fabricator > Standard Fabricator Connections > Beam Seat Settings applied to both beam seats and joist seats. Now that option only applies to beam seats.

Angle seat to supporting member : Bolted or Welded . This applies when ' Unstiffened L ' or ' Stiffened L ' is selected as the " Top chord seated material " and ' Automatic ' is selected for " Seat to supporting member " under the seated " Connection specifications " on the Joist Edit window or at Home > Project Settings > Job > Auto Standard Connections or User Defined Connections .

When " Seat to supporting member " is ' Automatic ' . . .

' Bolted ' instructs connection design to field bolt the angle seat to the supporting column. The angle shop bolts to the supporting column and the seat field bolts to the joist. The seat is drawn on the column detail.

' Welded ' instructs connection design to shop weld the angle seat to the column. The seat is drawn on the column detail.

In SDS2 software versions prior to v2017, " Angle seat to supporting member " in Home > Project Settings > Fabricator > Standard Fabricator Connections > Beam Seat Settings window applied to both beam seats and joist seats. Now that option only applies to beam seats.

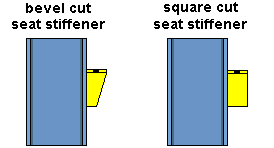
Square cut seat stiffener : or .

If this box is checked ( ), connection design square cuts the stiffener on the seated connection.

If the box is not checked ( ), connection design bevel cuts the stiffener.

In SDS2 software versions prior to v2017, " Square cut beam seat " in Home > Project Settings > Fabricator > Standard Fabricator Connections > Beam Seat Settings applied to both beam seats and joist seats. Now that option only applies to beam seats.

home > project settings > fabricator > standard fabricator connections > | top


------ Bearing connections ------

OSHA span for bolted connections: The minimum joist span (a distance in the primary dimension " Units " or other units ) at which connection design will attempt to bolt the joist's top or bottom chord to the beam's top flange. A joist's span is its " WP to WP length: actual ." OSHA stands for Occupational Safety and Health Administration and is the US government regulatory agency responsible for protecting worker health and safety in the United States. The following requirement applies to construction in the USA:
Except for steel joists that have been pre-assembled into panels, connections of individual steel joists to steel structures in bays of 40 feet (12.2 m) or more shall be fabricated to allow for field bolting during erection.
                            --- OSHA requirement, section 1926.757(a)(8)


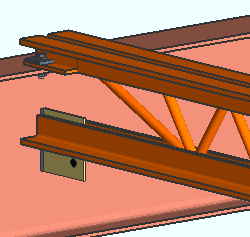
An example of a joist that is field bolted to the top flange of a beam. OSHA requires that joists with spans of 40 feet or greater be field bolted during erection.

If the joist frames to the top of a beam's flange and its " Input connection type " is set to ' Bearing ' and " Chord to support " is set to ' Welded ' and the " OSHA span for bolted connections " is less than the joist's "' WP to WP length: actual ," connection design will, unless the connection fails, generate a bolted connection, even though " Chord to support " was set to ' Welded '. This is also true for similar conditions when the " Input connection type " is ' Auto standard ' or ' User defined '.

home > project settings > fabricator > standard fabricator connections > | top


------ Bearing and seated connections ------

Stabilizer plate erection hole diameter : The diameter (in the primary dimension " Units " or other units ) of the erection hole in a joist's bottom stabilizer plate.
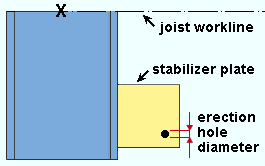
Per an OSHA standard, the bottom chord stability plate includes a hole for guying or plumbing cables. That hole is the " Stabilizer plate erection hole diameter ." The hole is placed 1 1/2 inch ( from the bottom edge and joist edge of the plate..

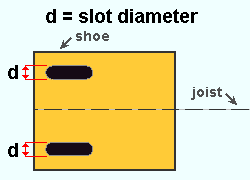
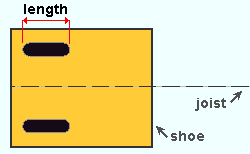
Bearing shoe slot length : The length (in the primary dimension " Units " or other units ) of the slotted holes in the joist shoe. This applies to slots in joists with either bearing connections or seated connections.

Slot length is the distance between the two points farthest from one another on the perimeter of a slot.

Connection design lock: " Slot length " in the " Bearing Shoe Slots " leaf
Connection failure message: Joist bearing shoe length is not sufficient to accommodate bolts to support

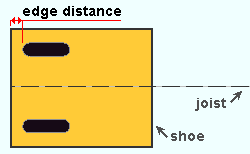
Bearing shoe slot edge distance : The distance (in the primary dimension " Units " or other units ) from the framing edge of the shoe to the slot. This dimension is measured parallel with the joist.

Both slots in the shoe are the " Bearing shoe slot edge distance " from the end of the shoe.

Connection design locks: " Slot edge distance (NS) " or " Slot edge distance (FS) " in the " Bearing Shoe Slots " leaf.
Connection failure message: Joist bearing shoe slot edge distance less than setup minimum

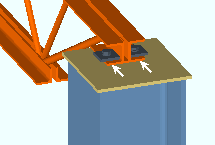
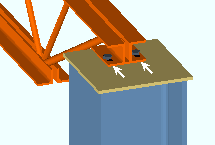
Allow washers on bearing shoe slots: or . This option applies when " Allow washers on shoe slots " is set to ' Automatic ' in the " Connection Specifications " leaf on the Joist Edit window.

   Allow washers
   Allow washers

When " Allow washers on shoe slots " is ' Automatic ' . . .

If this box is checked ( ), connection design adds material plate washers on bearing shoe slots for bolted joist bearing and seated connections.

If the box is not checked ( ), connection design does not add material plate washers on shoe slots.

home > project settings > fabricator > standard fabricator connections > | top


------ Flush framed connections ------

Knife plate thickness: The thickness (in the primary dimension " Units " or other units ) of the knife plate. Vulcraft CJ series joists are typically used with the ' Flush framed shear ' and ' Flush framed clip ' ( new ) connection types. However, using a CJ series joist as your " Section size " is not a requirement. Regardless of the joist series, connection design will attempt to create a knife plate that is the thickness that you enter here.

This illustration shows the connection's field bolts that fasten the shear plate to the knife plate. The supporting member is hidden, as is the shear plate. Only the supported joist is shown.

Connection design locks: Changing the " Plate thickness " in the " Knife Plate " leaf instructs connection design to override the choice made here.

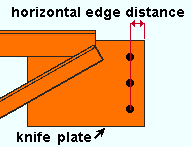
Knife plate horizontal edge distance: The distance (in the primary dimension " Units " or other units ) from the framing edge of the joist's knife plate to the center of the nearest column of bolts. A knife plate can have two columns of bolts when the " Connection specifications " option " Try two bolt column shear tabs " is checked.

The horizontal edge distance that is entered here applies regardless of whether the joist frames to a beam or column. The connection to the knife plate can be a clip angle or a shear plate.

Connection design locks: Changing the " Horizontal edge distance " in the " Knife Plate " leaf instructs connection design to override the distance that is entered here.

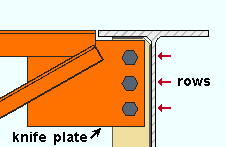
Minimum number of rows: The minimum number of bolt rows ( 1 or 2 or 3 or etc.) that connection design creates for the attaching of the shear plate or clip angle to the knife plate.

The number of rows entered here is the minimum that is used by connection design, regardless of whether the joist frames to a beam or column. Increasing the " Load " on the joist is one way to increase number of rows that are actually designed.

Connection design locks: After a flushed frame shear connection has been designed in the model, the number of " Rows " can be changed in the " Shear Tab " leaf to be less (or more) than the minimum that is entered here.

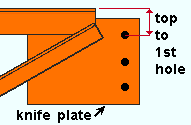
Top of steel to first row: The distance (in the primary dimension " Units " or other units ) from the top of the joist to the center of the top hole in the joist's knife plate.

The distance shown here applies regardless of whether the joist frames to a beam or column. The connection to the knife plate can be a clip angle or a shear plate.

Connection design locks: A flush framed shear connection is originally designed using the distance that is entered here. You can then, if you so choose, change the " Vertical to 1st hole " distance in the " Shear Tab " leaf to override that distance.

home > project settings > fabricator > standard fabricator connections > | top


------ Joist type specific settings ------

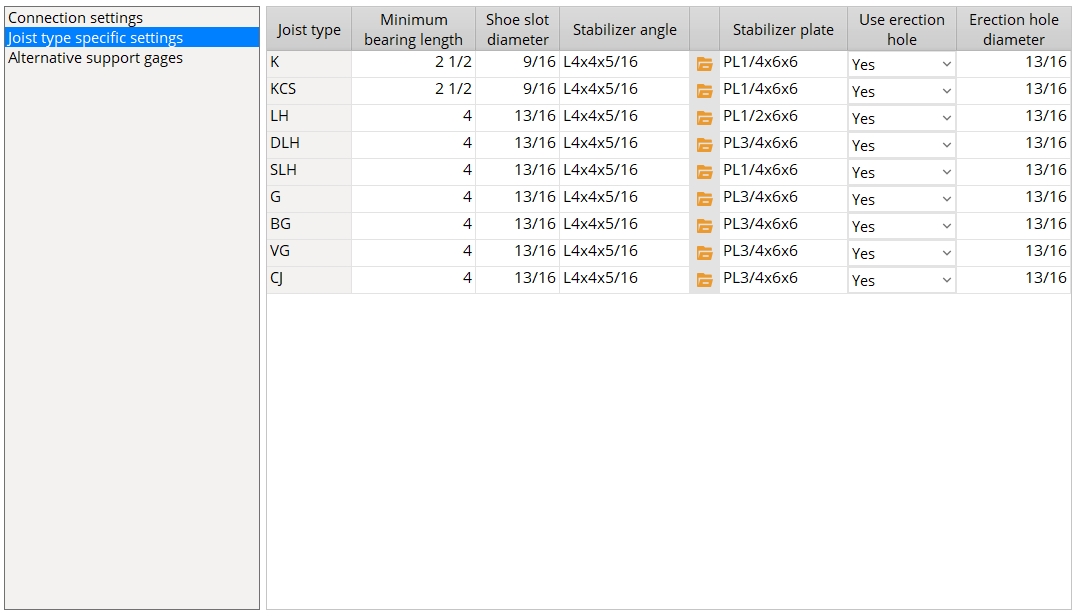
Columns on the "User pre-configured panel" table :

Joist type: Each of the rows on this table has a joist type assigned to it These joist types include K , KCS , LH and others.. Entries to columns in a particular row apply to that joist type. The information that the user enters for a particular " Joist type " may be used for bearing connections and seated connections.

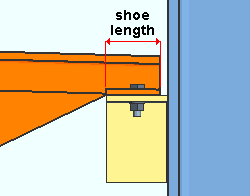
Minimum shoe length : A distance (in the primary dimension " Units " or other units ). This dimension is measured parallel with the joist, from the outer edge of the shoe (left or right) to the interior edge of the shoe. The " Shoe length " that connection design enters for " Auto " is at least the " Minimum shoe length " that is entered here. If you manually enter a " Shoe length " that is less than the " Minimum shoe length " that is entered here, the connection will fail with the message, " Supporting surface is shorter than minimum joist bearing length ."

" Minimum shoe length " applies to both seated connections (shown) and bearing connections (not shown).

Shoe slot diameter : The diameter (in the primary dimension " Units " or other units ) of the slots to be used in the shoes for whatever " Joist type " is specified on this line of this table.

Beware: " Shoe slot diameter " only sets the diameter of the slots in the shoe. It does not set the diameter of the holes in the beam flange or seat that the joist shoe bears upon. That diameter is set under " Default bolt criteria " in Bolt Settings .

Connection design lock: " Bolt bearing shoe diameter " in the " Bearing Shoe Slots " leaf
Connection failure message: Joist bearing shoe diameter is too small to accomodate bolts to support

Stabilizer angle: The section size of the angle (e.g., ' L4x4x5/16 ') to be used when ' Angle ' is selected as the " Stabilizing material " for a bottom chord extension. You need to make separate entries for " K joist " and for " LH joist " and for " DLH joist " and so on ..
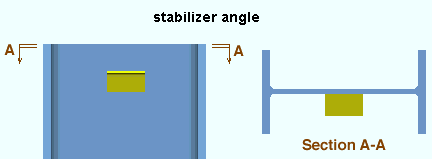
To enter an angle, either type in the section size that you want, or press the "file cabinet" browse button ( ) and choose an angle section from the list that appears.

Example: To the row for " LH joist ," you enter ' L4x4x5/16 '. Later, in Modeling , you add a joist with a " Section size " of ' 20LH10 ' and select ' Angle ' as the " Stabilizing material " for that joist. Connection design applies a L4x4x5/16 angle as the stabilizer angle.

Stabilizer plate: The size of plate (e.g., ' PL1/2x6x6 ') to be used when ' Plate ' is selected as the " Stabilizing material " for a bottom chord extension. You need to make separate entries for " K joist " and for " LH joist " and for " DLH joist " and so on.
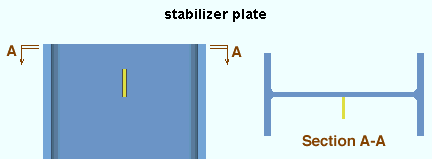
Connection design creates bottom chord stability plates when ' Plate ' is the " Stabilizing material " for an extended bottom chord. The bottom edge of the plate is placed 3 inches(76 mm) below the joist chord, in accordance with the OSHA standard.

Example: To " K joist " under " Bottom chord extension plate " on this window, you enter PL1/2x6x6 . Later, in Modeling , you add a joist with a " Section size " of ' 16K9 ' and select ' Plate ' as the " Stabilizing material " for that joist. Connection design applies a PL1/2x6x6 plate as the bottom chord stability plate.

Use erection hole: Yes or No . This applies when the option " Use erection hole " on the Joist Edit window in " Connection specifications " is set to ' Automatic '.

" Use erection hole " sets whether or not a bottom chord stabilizer plate includes an erection hole when " Use erection hole " is set to ' Automatic '.

' Yes ' instructs connection design to add a bottom chord stabilizer plate erection hole when " Use erection hole " is set to ' Automatic '. The bottom chord hole has a 1 1/2 inch edge distance. Its diameter can be changed from its default of 13/16 inch (21 mm).in the " Joist Stabilizer Plate " leaf.

' No ' instructs connection design to add a bottom chord stabilizer plate erection hole when " Use erection hole " is set to ' Automatic .

In summary: This setup table lets you set " Use erection hole " on a per " Joist type " basis. For example, you could set stabilizer plates for K joists to have an erection hole while stabilizer plates for all other joist types have no hole. Of courser, the choice you make here can be overridden on a per-joist basis by using " Use erection hole " in " Connection specifications " on the Joist Edit window.

home > project settings > fabricator > standard fabricator connections > | top


------ Wide flange beams, alternative gage for joist connections ------

VIDEO The table for " Alternative flange gages, wide flange ... " is filled out in Joist Connection Settings . Measurements are then taken for an actual joist bolted to a wide flange beam in the model to confirm that the correct flange gage has been applied. ( SDS2 Detailing , v2016)

Alternative gage is the default gage: or . This applies when a joist top chord bolts to a wide flange beam's top flange. You can get such a connection by framing a joist to a wide flange beam's top flange. The joist's " Input elevation " must be the elevation at which the joist bears on the beam's top flange. The joist's " Input connection type " should be ' Bearing ' (or ' User defined '), and the " Chord to support " should be set to ' Bolted ' for the appropriate end on the Joist Edit window.

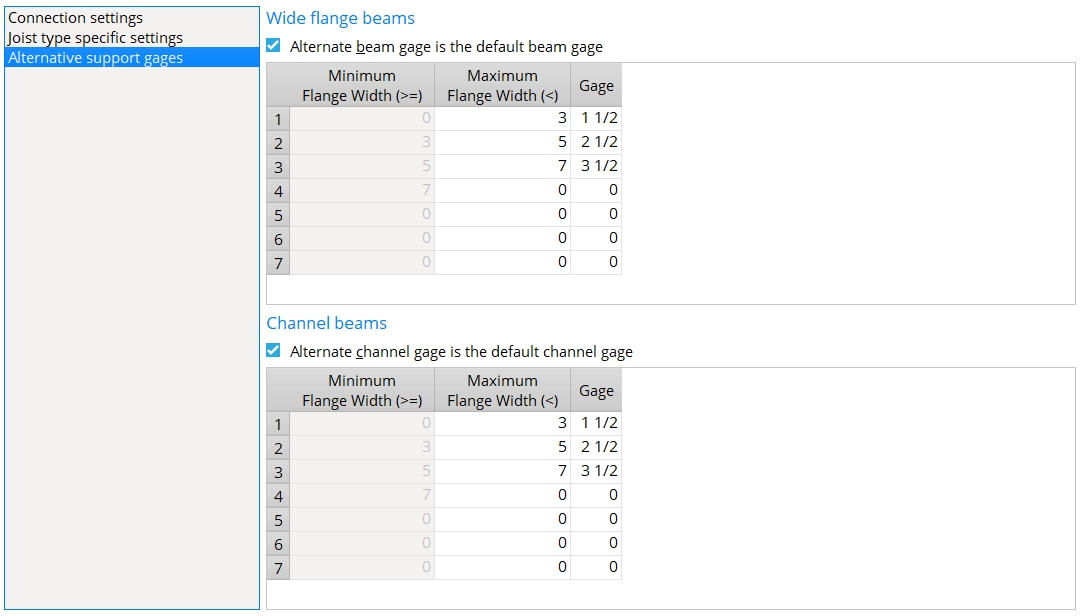
If this box is checked ( ), connection design uses the wide flange beam " Gage " that is set on this window in the table that is represented below. That gage is based on the flange width of the beam that is being connected to. The first two columns on this table set a range of wide flange beam flange widths. The third column sets the gage to be used for wide flange beams whose flange widths are within the specified range.

flange width is greater than or equal to ( >= ) flange width is less than
( < )
Gage

The values in the first column are filled in automatically. They represent the lowest flange width at which the " Gage " entered in a particular row will be applied.

The values in the second column can be filled in manually. Each such value represents the largest flange width at which the " Gage " entered in a particular row will be applied. The gage on the wide flange beam will be used as the "default alternative gage" for joists bolted to the top flange of a wide flange beam.

If the box is not checked ( ), connection design uses the " Gage " that is set in the local shape file for the " Section size " that is used by the wide flange beam that the joist connects to.
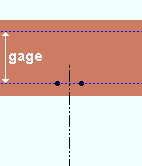
A joist bolted to the top chord of a wide flange beam. The beam's flange gage, which is specified in the local shape file, positions the holes in the flange of the beam.

home > project settings > fabricator > standard fabricator connections > | top


------ Channel beams, alternative gage for joist connections ------

Alternative gage is the default gage: or . This applies when a joist top chord bolts to a channel beam's top flange. You can get such a connection by framing a joist to a channel beam's top flange. The joist's " Input elevation " must be the elevation at which the joist bears on the beam's top flange. The joist's " Input connection type " should be ' Bearing ' (or ' User defined '), and the " Chord to support " should be set to ' Bolted ' for the appropriate end on the Joist Edit window.

If this box is checked ( ), connection design uses the channel beam " Gage " that is set on this window in the table that is represented below. That gage is based on the flange width of the beam that is being connected to. The first two columns on this table set a range of flange widths. The third column sets the gage to be used for channel beams whose flange widths are within the specified range.

Minimum flange width
( >= )
Maximum flange width
( < )
Gage

The values in the first column are filled in automatically. They represent the lowest flange width at which the " Gage " entered in a particular row will be applied.

The values in the second column can be filled in manually. Each such value represents the largest flange width at which the " Gage " entered in a particular row will be applied. The gage on the channel beam will be used as the "default alternative gage" for joists bolted to the top flange of a channel beam.

If the box is not checked ( ), connection design uses the " Flange Gage " that is set in the local shape file for the " Section size " that is used by the channel beam that the joist connects to.
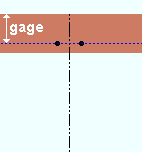
A joist bolted to the top chord of a channel beam. The beam's flange gage, which is specified in the local shape file, positions the holes in the flange of the beam.

home > project settings > fabricator > standard fabricator connections > | top


   To close the Joist Connection Settings window :


"OK" (or the Enter key) closes the Joist Connection Settings window (this window) and saves the settings on it to the current Fabricator . To change to a different Fabricator , Home > press "fabname" > double-click the Fabricator you want.

Note: If you want changes to this window applied to particular members, you can Process Selected Members then Process and Create Solids . Or you can Mark Members for Processing then Process and Create Solids .

"Cancel" (or the Esc key or the button) closes this window without saving any changes made to it.

"Reset" undoes all changes made to this window since you first opened it. The window remains open.

home > project settings > fabricator > standard fabricator connections > | top